


Refinishing the Bathroom Vanity Top: Part 1
- Suzanne Pritchard
- Sep 8, 2010
- 2 min read

When we bought our house, the master bathroom was decorated in not-so-lovely shades of brown. While we haven’t wanted to splurge on redoing the tile, we have completely repainted the whole thing, bought new hardware, and really tried to update the look. A constant thorn in my side keeping me from truly enjoying our bath was the swirly brown cultured marble vanity top.
The original vanity top

A close-up

After hours of internet research, I decided to try out a product called Rust-Oleum’s Tub and Tile Refinishing Kit. We would like to completely replace the vanity and tile one day; this $25.00 fix was meant to only get rid of the swirly brown for now.
We pulled the vanity off the counter (after disconnecting plumbing); the past owners made that part easy by not caulking the vanity top! (Yay)
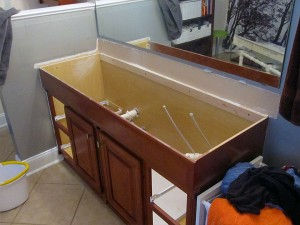
The kit requires a certain amount or prep work; in our case, we washed the surface with Lime-Away and then sanded the counter down with fine grit sandpaper. We mixed the two chemicals and quickly used a low-nap, 4″ roller to do the first coat. (It already looked so much better!)

I used a brush (for the sake of experimentation) to do the second coat, and I would really recommend the opposite approach to anyone undertaking this project. The brush will allow you to get a really heavy coat first coat (no streaks). If you follow that with a rolled coat, I think the smoothness would result in the perfect finish. The brush definitely adds more bubbles.

Close-Up View

The directions indicate a second coat is ok after an hour drying time for the first. But don’t extrapolate & think that you can touch the top after the second coat dries for an hour. It feels dry, but those fingerprints will stay! Stay tuned for the finished product (after the full 3 days drying time)!


Comments